- Published on
Creating a Christmas scavenger hunt
- Authors


Introduction
This year my kids are four and very nearly three, which means their understanding of Christmas has hit the point where excitement is bursting out of them. Whereas we'd normally get a tree and decorate the house a couple of weeks before "the big day", this year we'd bought a real 7ft Christmas Tree and decorated it, and the house, by the end of November.
I've been doing small things, around the house, to really get them in the Christmas spirit, including:
- Setting up an Alexa routine so when they say "Alexa, Merry Christmas" it turns on the Christmas Tree lights and plays All I Want for Christmas Is You
- Having the outside lights come on when my daughter gets back from school
- Littering our garden with solar Christmas lights (this one was actually all my wife)
But it didn't feel like quite enough and this year I wanted to do something BIG. So, after some thought, I decided to create a fully automated Christmas scavenger hunt.
Equipment/Services
In no particular order, this is a list of equipment/services I used in this exercise. Unless explicitly stated, if I reference them in this blog post then I'm referring to the product linked here.
Pre-requisites
- Home Assistant must be accessible externally, as Alexa uses the URLs for the audio files. I did this with Nabu Casa but presumably it will work with other methods.
Caveats
- This is not a blog post about how to set-up Home Assistant, Alexa Media Player, or Nabu Casa, and it assumes the reader is familiar with all of these technologies.
- This is not designed to be an in-depth tutorial. Although there will be a lot of information, this is simply going to document the process I went through to achieve what I wanted.
Having said that, if you do find yourself stuck and needing help, I will help where I can/when time permits.
The Idea
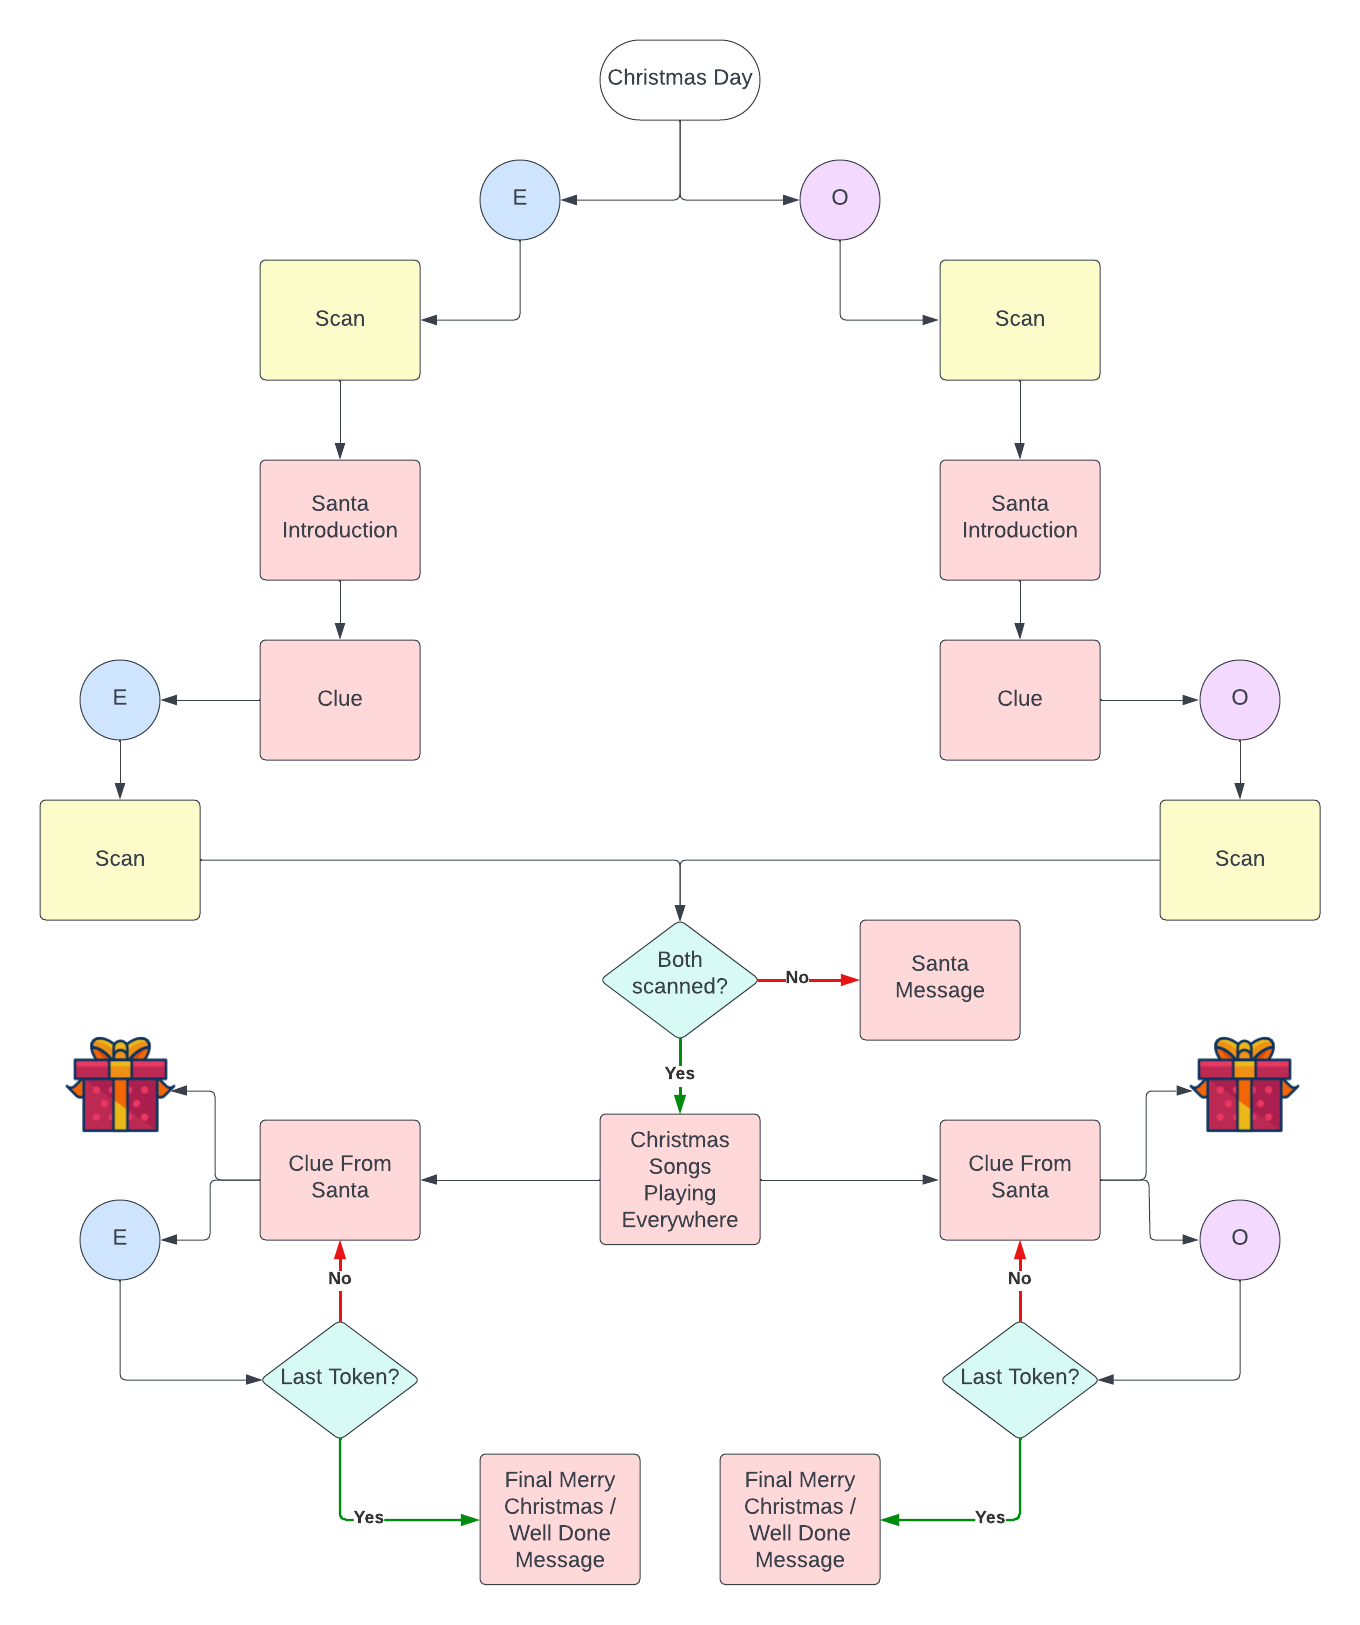
The premise of the scavenger hunt is that my kids have been extra good this year and Santa wanted to give them something extra special to do on Christmas Day. They'll still get their stockings and big presents as normal, but Santa will also be dropping off one "token" (NFC tag) each that they'll have to scan and then follow clues to subsequent presents/tokens.
Because they are still quite young and I don't want them to get bored, there will only be ten tags each (including the initial one).
Before doing anything, I wanted to map out a general workflow that I aim to implement. As I'm typing, there are a lot of unknowns in this plan so we'll see how different the end result turns out to be.
Creating Messages From Santa
Thanks to a very generous free quota from Eleven Labs, I was able to use their Speech Synthesis Text To Speech (TTS) engine to create all the messages I needed with Santas voice. Once generated, I followed the below steps for each message:
- Downloaded the mp3 file from Eleven Labs
- Converted it to the correct format for my Alexa devices (command provided by jovo):
ffmpeg -i <input-file> -ac 2 -codec:a libmp3lame -b:a 48k -ar 24000 <output-file.mp3>
- Uploaded it to my Home Assistant installation in a
{config}/www/mp3directory (note: it must be under thewww/directory, but not necessarily/mp3). - Tested it was accessible by visiting
https://{External HA URL}/local/mp3/{MP3 File Name}.mp3in a browser. - Tested it worked with Alexa by going to
Developer Tools > Servicesand then using the following template:
service: notify.alexa_media
data:
  message: "<audio src='https://{External HA URL}/local/mp3/{MP3 File Name}.mp3'/>"
  target: media_player.{name of Alexa device}
  data:
    type: tts
All in all I generated 20 different recordings, 10 for each child, including an "initial" message explaining what was happening, and a "final" message for Santa to say goodbye.
Registering NFC Tags
The NFC tags will fall into one of three categories:
- Initial NFC tag, which will be in their stockings with a note from Santa explaining what's going on.
- Clue NFC tags, which will be dotted around the house and will lead to additional clues and presents.
- Last NFC tag, which will be the final message from Santa.
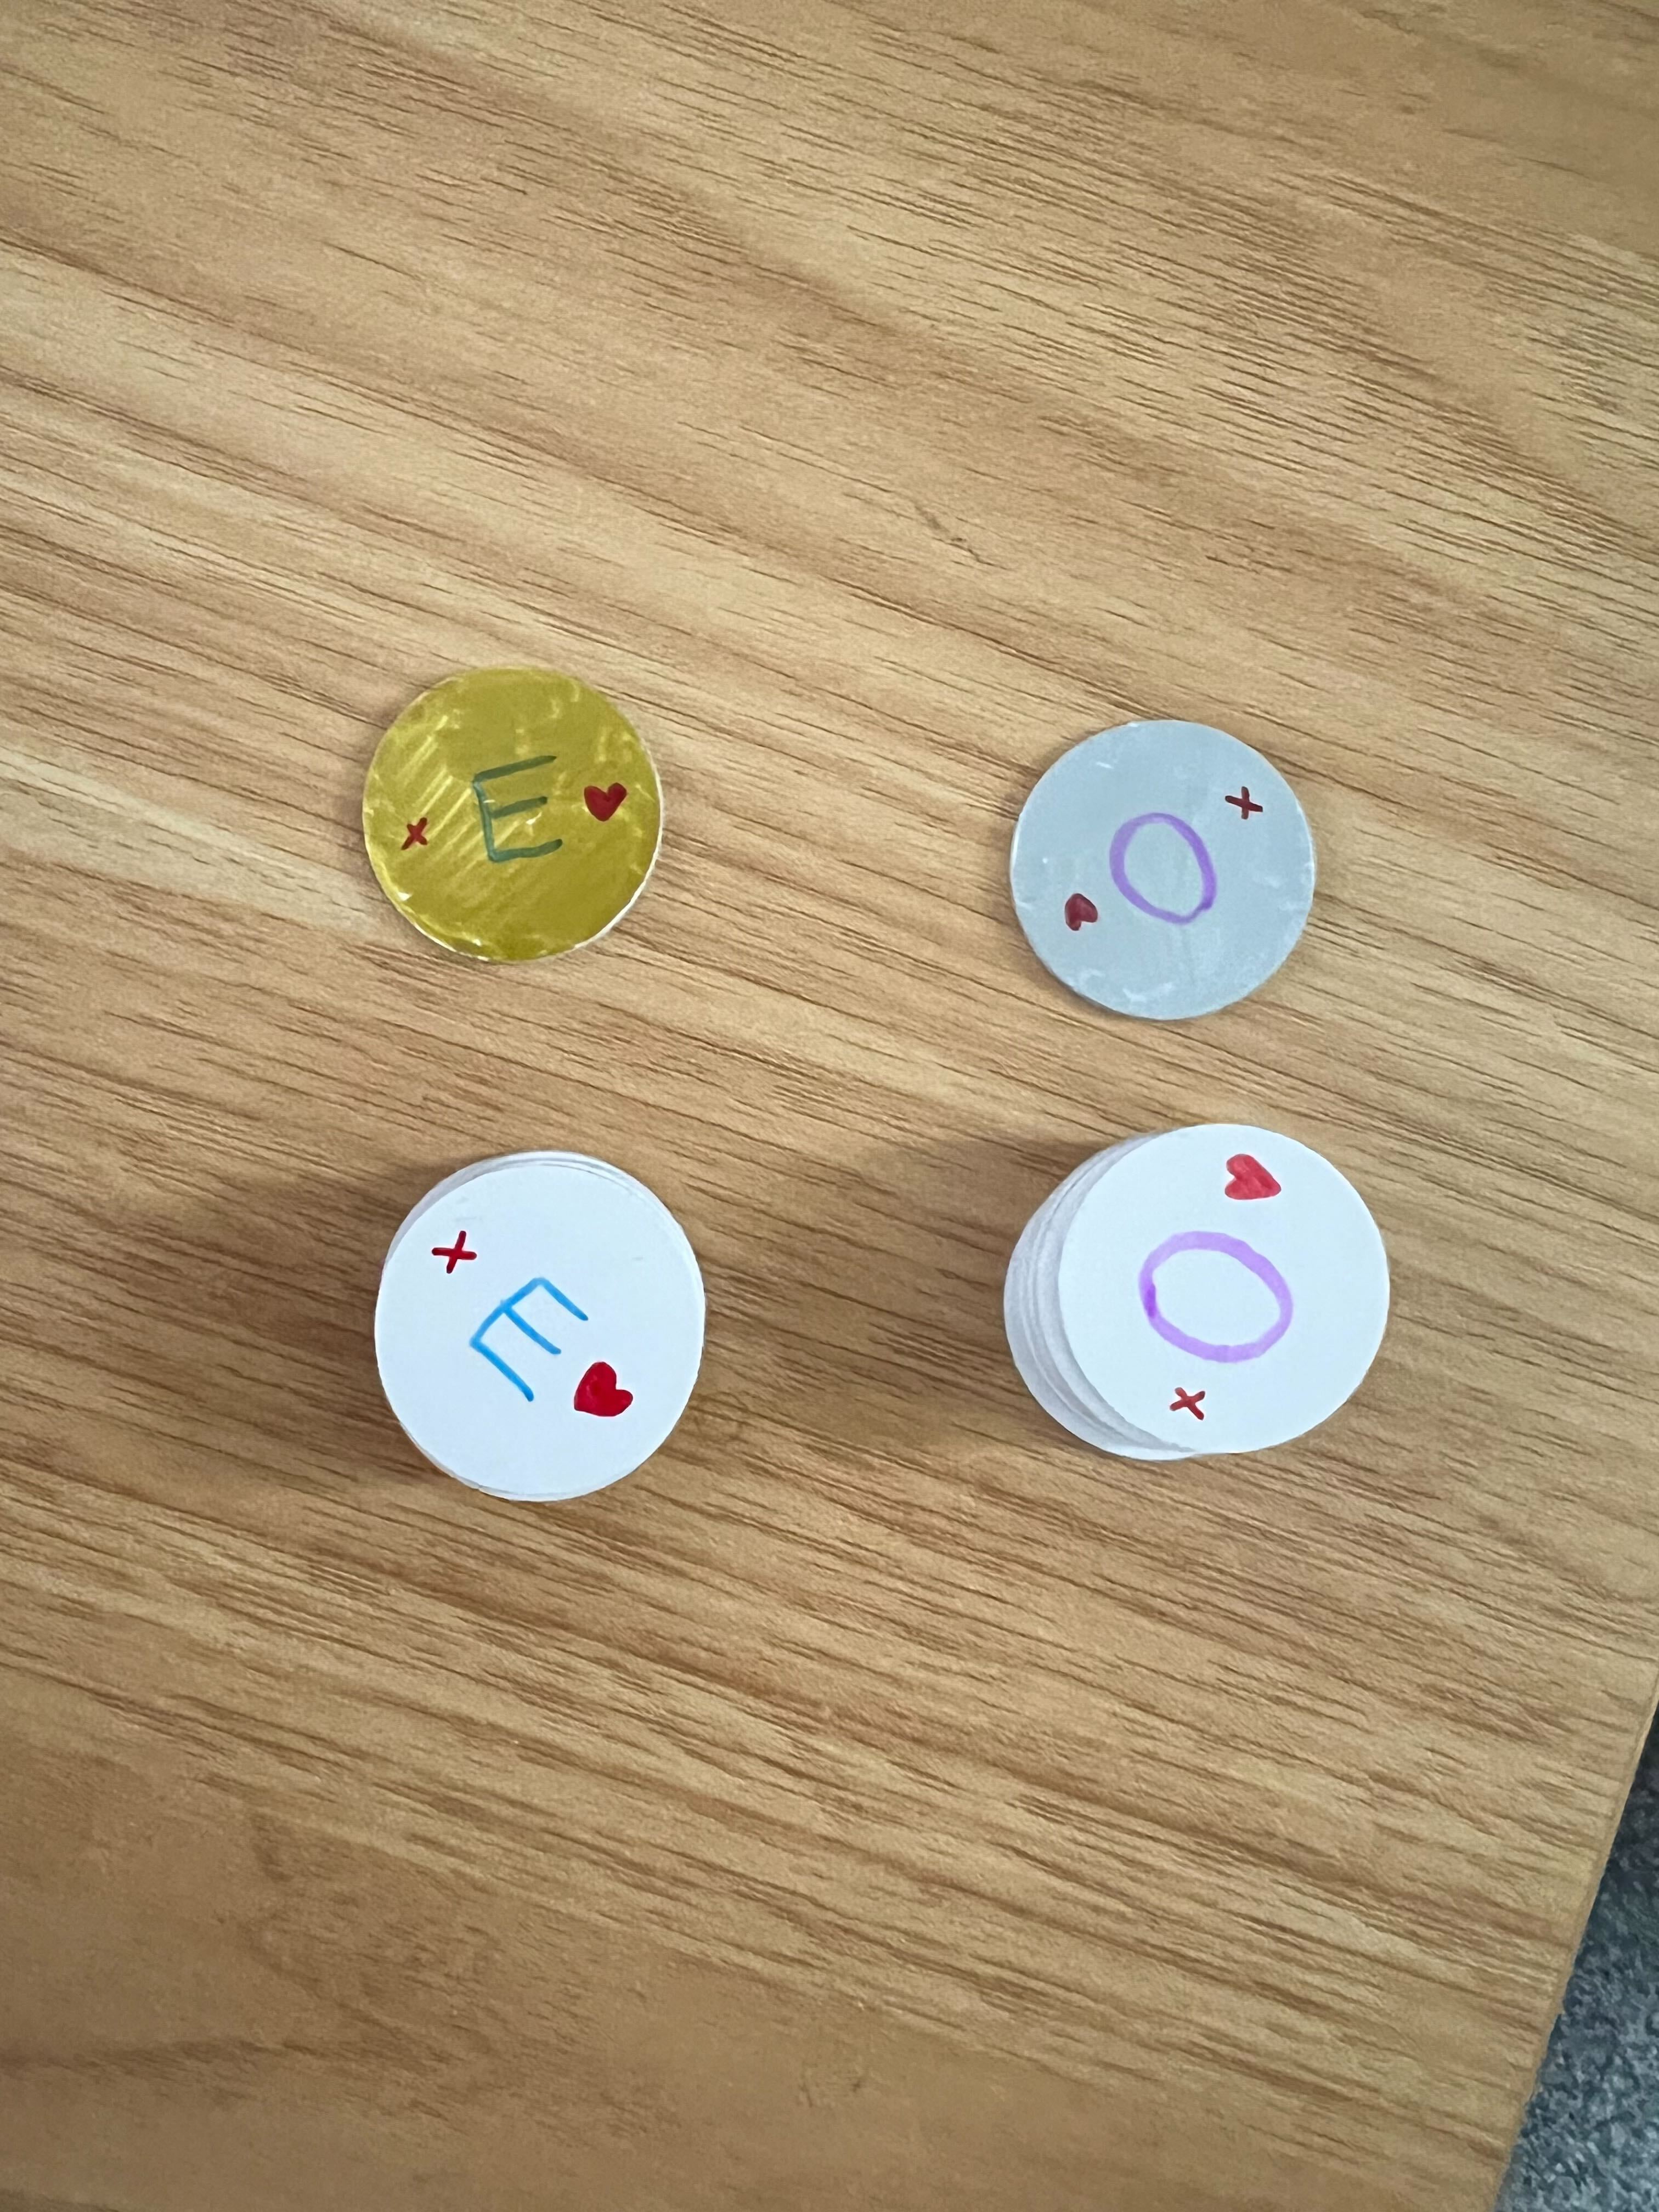
Because the difference between the second two groups will be handled in Home Assistant, for reasons I will explain later, I just needed to make a distinction between which tag would be the initial one. For this, I had my wife colour them silver/gold and left the rest white; all then had the kids initial, so they knew which was theirs.
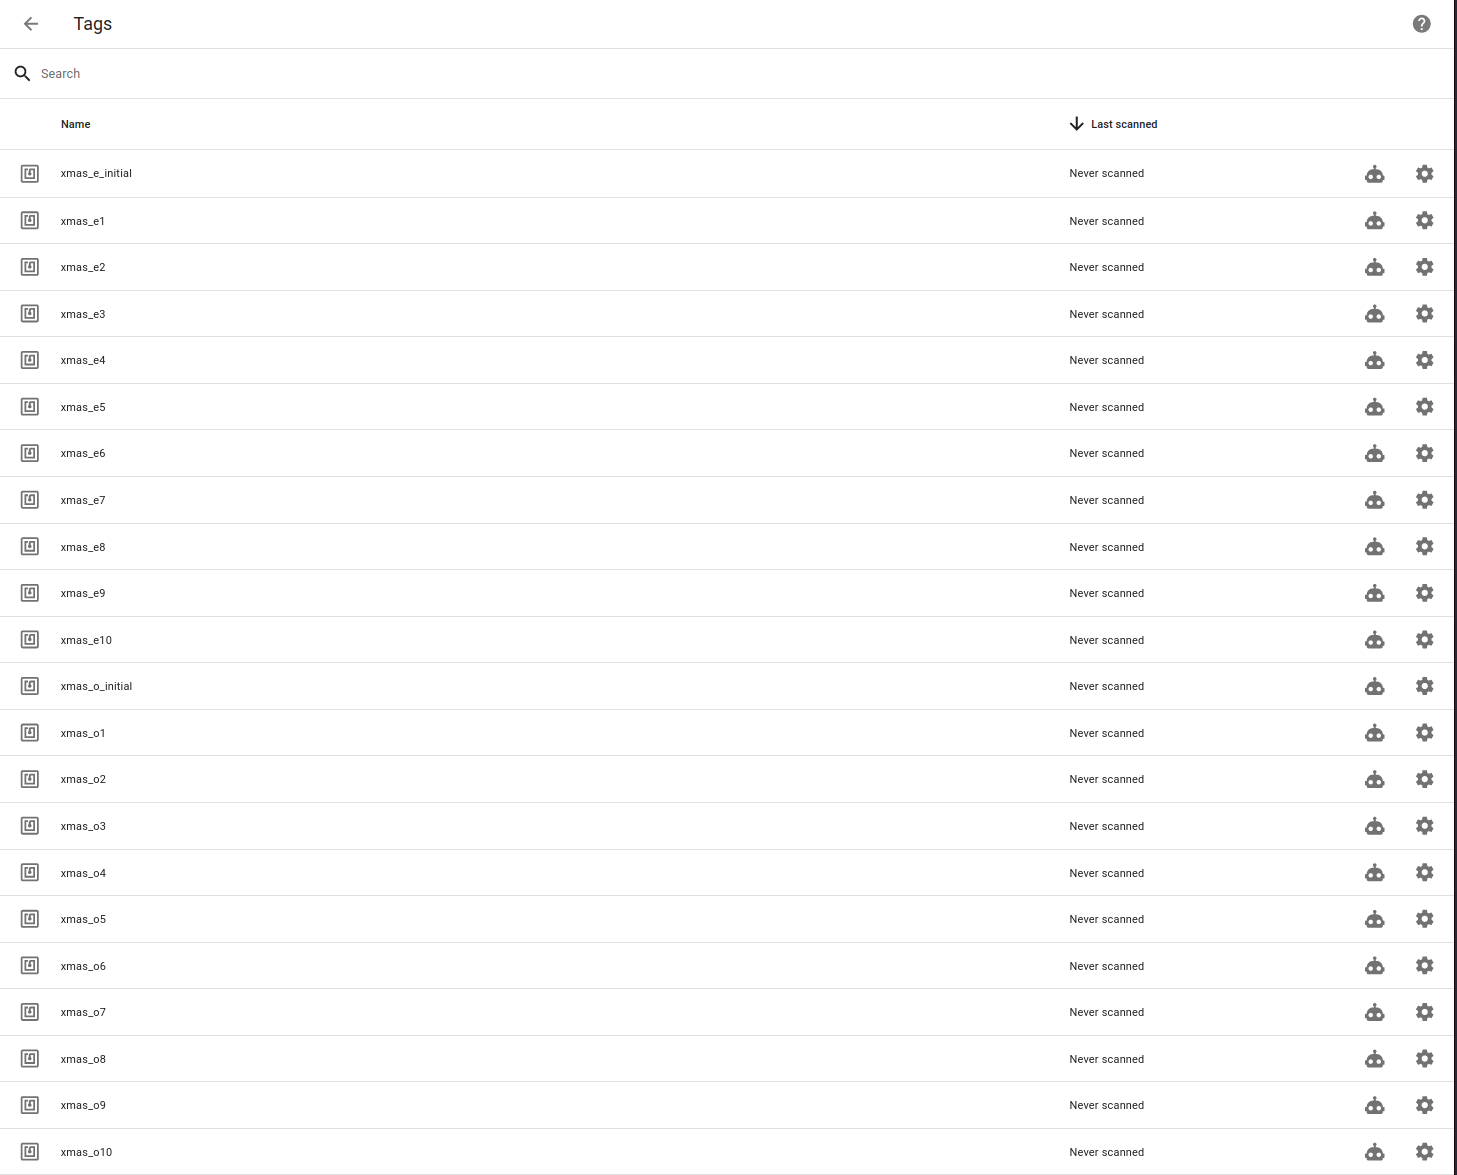
For each tag, I then registered them via the Home Assistant app on my iPhone (Settings > Tags > Add Tag). The initial one followed the naming convention xmas_{kids_initial}_initial and the rest followed xmas_{kids_initial}{n}, where n is the last number plus one.
Programming NFC Tags
Workflow and Helpers
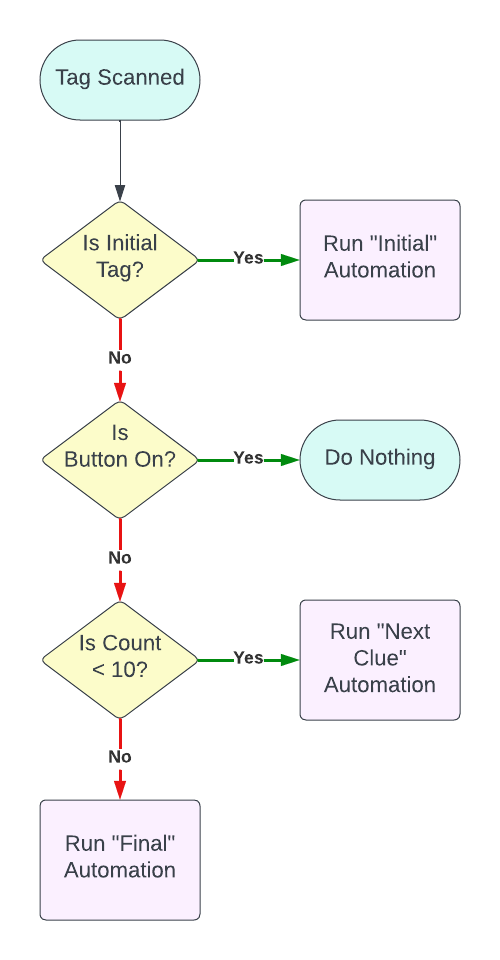
Once the NFC tags were registered in Home Assistant, it was time to assign automations to them. Because they are kids and thus are very unlikely to stick to a specific script, I had to make the whole process as flexible as possible. Instead of assigning each tag a specific message, expecting them to be scanned in order, I needed to add the following safeguards:
- Each tag can only be scanned once. If scanning the same tag played more than one clue, the whole process would quickly get out of sync and confusing.
- The non-initial tags must be dynamic. It shouldn't matter which tags are scanned in which order, the message order must be the same.
- When all but one tag has been scanned, the next tag should set off the final automation.
To achieve this, I created the following helpers (Settings > Devices & Services > Helpers > Create Helper):
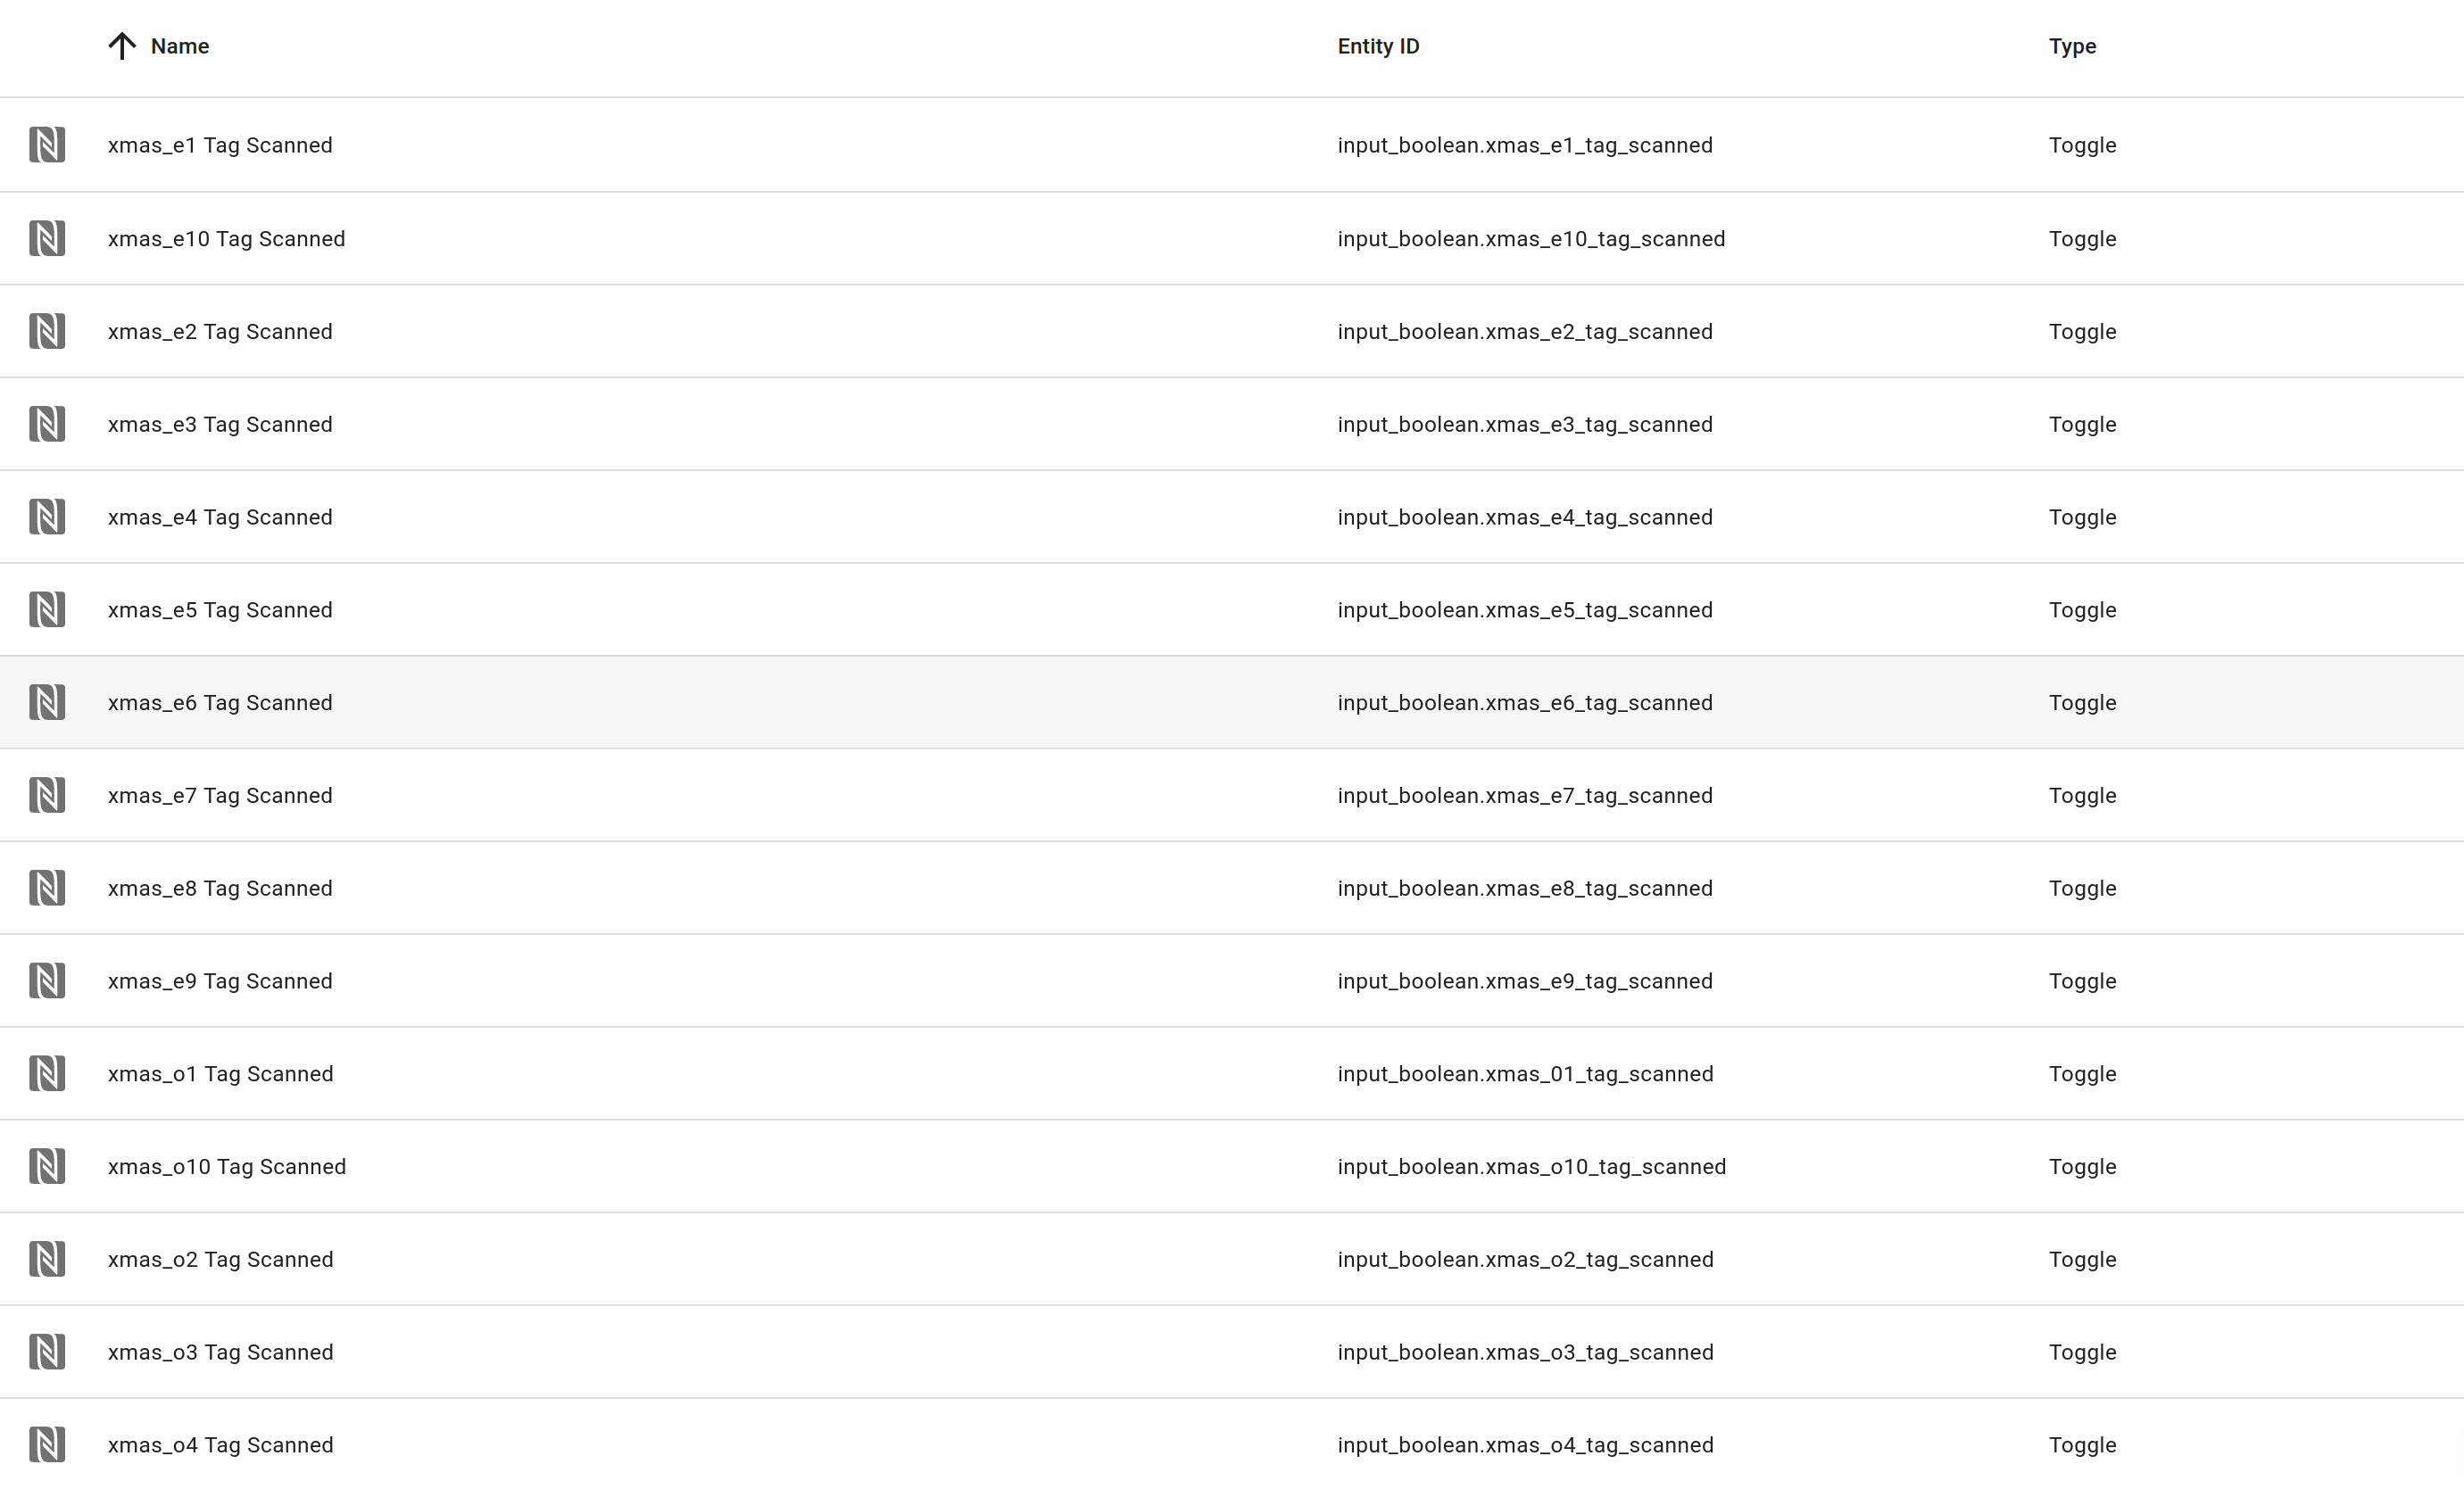
Tags Scanned. Acounterhelper, with an initial value of1, step size of1, and entity ID ofcounter.tags_scanned.{Tag Name} Tag Scanned. For each of the non-initial NFC tags we registered in Home Assistant, aninput_booleanhelper so we can mark when a tag has been scanned.
Santa TTS Script
Next, because I didn't want to create a script for every automation stage, I created a generic Santa TTS script which accepts an audiofile parameter and plays it using Alexa Media Player:
alias: Santa TTS
sequence:
  - service: notify.alexa_media
    data:
      message: <audio src="https://{External HA URL}/local/mp3/{{ audiofile }}"/>
      data:
        type: tts
      target:
        - media_player.{speaker}
        - media_player.{speaker}
        - media_player.{speaker}
        - media_player.{speaker}
        - media_player.{speaker}
fields:
  audiofile:
    selector:
      text: null
    name: audiofile
    required: true
mode: single
icon: mdi:microphone
Which can then be used like so:
service: script.santa_tts
data:
  audiofile: 'merrychristmasresponse.mp3'
Automations
For the automations, I had two ideas.
- Create an automation for each NFC tag, which gets triggered on a specific NFC tag being scanned, has a condition of the
input_booleanhelper we defined earlier beingoff, and then calls thealexa_mediaservice to play the message from Santa, increments thetags_scannedcounter, and then turns the aforementionedinput_booleantoon. - Create an automation for the initial NFC tags, and another for the rest of the NFC tags with multiple
ifstatements, following a similar pattern to the first option above.
I decided, for maintainability and not having to duplicate the effort 20 times, to go for the second option. I started with the non-initial NFC tags, just to make sure the idea would work, by creating a new automation (Settings > Automations & Scenes > Automations > Create Automation), and then adding a When a tag is scanned trigger for each of the xmas_e{number} NFC tags (Note: To avoid having to go through the same dropdown box process multiple times, I added one trigger, went to the yaml view, duplicated the empty trigger ten times in vim, then went back to the UI view to select the NFC tags).
The Actions section was a lot more trial and error. First I had to try and figure out what I could use to identify which tag was scanned; to do this I started with a simple action (notify.mobile_app_iphone) which would send my phone a notification with details of the trigger:
service: notify.mobile_app_iphone
data:
  message: >
    This is a test -- {{ trigger }}
This gave me back a JSON object, but changing trigger to trigger.tag_id returned blank so I did some searching around and found this post on the HA forums. After outputting trigger.event.data I saw there was a name field, so I updated the action to use it:
service: notify.mobile_app_iphone
data:
  message: >
    This is a test -- {{ trigger.event.data.name }}
Which started notifying me of the tag name that was scanned.

This gave me the idea that I could utilise the tag name in a condition that would check, and only proceed if, it was in an off state. If it was in an on state, then the tag has already been scanned and we should not continue.
After a lot more trial and error, I ended up with the following which creates a variable (input_entity) and an action which prints out the variable, the current state of the calculated entity name, and whether it was in an off or on state.
action:
  - service: notify.mobile_app_iphone
    data:
      message: |
        This is a test -- {{ input_entity }} -- {{ states(input_entity) }} -- {{ is_state( input_entity , 'on') }} -- {{ is_state( input_entity , 'off') }}
variables:
  input_entity: input_boolean.{{ trigger.event.data.name }}_tag_scanned

This was the first building block I needed. Next was to try and use it in a condition that would result in the automation only running if the tag hadn't already been scanned. After longer than it should have taken (because I was still using notify.mobile_app_iphone to debug, and it randomly disappeared until I did a HA restart), I was left with the following condition/action which would only trigger a notification to my phone if the tags corresponding input_boolean was off.
condition:
  - condition: template
    value_template: "{{ is_state(input_entity, 'off') }}"
action:
  - service: notify.mobile_app_iphone
    data:
      message: This is a test -- {{ input_entity }}
variables:
  input_entity: input_boolean.{{ trigger.event.data.name }}_tag_scanned
So now we know the automation will only run if the tag hasn't already been scanned, we can start building out our action such that it will play the correct message depending on counter.tags_scanned. To start with, I kept using notify.mobile_app_iphone to make sure I had the logic right.
For this experiment, I used a simple if/elif/else statement for the message field and then incremented the counter.tags_scanned in each run; I was then able to run through all five stages by re-scanning the same tag.
action:
  - service: notify.mobile_app_iphone
    data:
      message: |
        {% if is_state('counter.tags_scanned', '0') %}
          The counter is zero
        {% elif is_state('counter.tags_scanned', '1') %}
          The counter is one
        {% elif is_state('counter.tags_scanned', '2') %}
          The counter is two
        {% elif is_state('counter.tags_scanned', '3') %}
          The counter is three
        {% elif is_state('counter.tags_scanned', '4') %}
          The counter is four
        {% else %}
          The counter is something else
        {% endif %}
  - service: counter.increment
    data: {}
    target:
      entity_id: counter.tags_scanned
I then reset counter.tags_scanned back to zero, and added in another action to switch the corresponding input_boolean to off so the same tag couldn't be used multiple times.
action:
  - service: notify.mobile_app_siphone
    data:
      message: |
        {% if is_state('counter.tags_scanned', '0') %}
          The counter is zero
        {% elif is_state('counter.tags_scanned', '1') %}
          The counter is one
        {% elif is_state('counter.tags_scanned', '2') %}
          The counter is two
        {% elif is_state('counter.tags_scanned', '3') %}
          The counter is three
        {% elif is_state('counter.tags_scanned', '4') %}
          The counter is four
        {% else %}
          The counter is something else
        {% endif %}
  - service: counter.increment
    data: {}
    target:
      entity_id: counter.tags_scanned
  - service: input_boolean.turn_on
    data: {}
    target:
      entity_id: '{{ input_entity }}'
variables:
  input_entity: input_boolean.{{ trigger.event.data.name }}_tag_scanned
I could still cycle through all five stages, but I had to use different tags. Re-scanning the same multiple tags had no effect. Take that kids!
Unfortunately, I couldn't get script.santa_tts to work with a conditional audiofile, similar to the message parameter in notify.mobile_app_iphone, as Alexa kept giving an error related to accessing a Simon Says skill.
service: script.santa_tts
data:
  audiofile: |
    {% if is_state('counter.tags_scanned', '0') %}
      ## first audiofile
    {% elif is_state('counter.tags_scanned', '1') %}
      ## second audiofile
    ## .. etc etc
    {% else %}
      ## last audiofile
    {% endif %}
Luckily, though, the built-in if/then action worked, even if it is more verbose:
condition:
  - condition: template
    value_template: "{{ is_state(input_entity, 'off') }}"
action:
  - if:
      - condition: state
        entity_id: counter.tags_scanned
        state: '1'
    then:
      - service: script.santa_tts
        data:
          audiofile: ## first audiofile
  - if:
      - condition: state
        entity_id: counter.tags_scanned
        state: '2'
    then:
      - service: script.santa_tts
        data:
          audiofile: ## second audofile
  ## etc etc
  - if:
      - condition: state
        entity_id: counter.tags_scanned
        state: '9'
    then:
      - service: script.santa_tts
        data:
          audiofile: ## last audiofile
  - service: counter.increment
    data: {}
    target:
      entity_id: counter.tags_scanned
  - service: input_boolean.turn_on
    data: {}
    target:
      entity_id: '{{ input_entity }}'
variables:
  input_entity: input_boolean.{{ trigger.event.data.name }}_tag_scanned
It was at this point I realised I'd need a separate tags_scanned counter for each child, so I renamed counter.tags_scanned to counter.e_tags_scanned, updated all of the above automation code, and then created a new counter.o_tags_scanned with the same settings.
I then added a much simpler automation to handle the xmas_e_initial tag, which stops any music playing, sets the volume to 0.8 (1 is the maximum volume), and then plays the initial message:
description: ''
mode: single
trigger:
  - platform: tag
    tag_id: f4c7943b-6b97-4bd7-8c1d-c2be8f4143b7
condition: []
action:
  - service: media_player.media_stop
    target:
      entity_id: []
      device_id:
        -  ## device
      area_id: []
    data: {}
  - service: media_player.volume_set
    data:
      volume_level: 0.8
    target:
      device_id:
        -  ## device
  - service: script.santa_tts
    data:
      audiofile: ## initial audio file
Lastly, I duplicated both automations and changed them to be applicable to my other child. Now to wait and hope it was worth all the effort.