- Published on
Create a MCP Server with Go and OAuth
- Authors
Table of Contents
- Change Log
- Introduction
- Prerequisites and Caveats
- Project Folder Structure
- OAuth
- Authentik
- Building the MCP Server
- Troubleshooting
Change Log
- 2025-11-28: Figured out why Claude Code was complaining about DCR. Post updated to use Claude for the whole tutorial.
Introduction
Recently I wanted to learn more about the MCP protocol, and so decided the best way to do it was to create a MCP Server. I opted to use the official SDK and it was surprisingly easy to get it set-up and working locally.
The MCP Server itself is backed by an API, for which a user has to be authenticated to use. I opted to start simple, and use an environment variable (API_KEY) to pass in a JWT that the MCP Server uses when connecting to the API on behalf of the user:
// ~/.claude.json
{
  // ... rest of config
  "mcpServers": {
    "custommcp": {
      "type": "http",
      "url": "${API_BASE_URL:-http://localhost:8080}",
      "headers": {
        "APIKey": "${API_KEY}"
      }
    },
  }
This worked, but it was a bit finicky and it was difficult to share with others.
I had read that the MCP protocol supported OAuth authorization, and seeing as the initial MCP creation was pretty painless I thought it would be good to dive into "proper authorization" so I didn't need to use headers/environment variables.
Several headaches later and I managed to get it working with 90% cruft, and 10% luck.
In an attempt to prove to myself that I do actually understand what I've built, I decided to build it all again, from scratch, and hopefully in a much cleaner way, documenting the whole journey in a blog (which you are reading right now).
Prerequisites and Caveats
- If you're following along I'm going to assume you:
- Have Docker installed
- Are running Ubuntu; although the steps may work on other systems, I can only guarantee it will work on what I use.
- Have Go installed
- Have at least a basic knowledge of Go
- The steps/configurations in this post are for local development purposes only. I've purposefully taken liberties with secrets to make my life easier.
- This blog is not intended to be a comprehensive tutorial on OAuth. While it will touch on OAuth topics, it is first and foremost a tutorial for setting up a MCP Server with OAuth authorization.
- I am neither an authoritative source on, nor an expert on, OAuth or MCP. This post is something I wish I had when I was starting to dabble in MCP (especially the authorisation side), but it's possible I have made errors.
Project Folder Structure
The folder structure I'll be using in this directory is outlined below.
.
├── authentik
│   └── docker-compose.yml
│   └── // other authentik related files/directories
├── go.mod
└── main.go
└── // other go related files/directories
OAuth
Before we dive into anything else, here's a quick rundown of some OAuth basics.
Terminology
Resource: The entity granting access to resources, which is often an end-user.Client(Claude Code): The entity requesting access on behalf of the resource ownerResource Server(MCP Server): The server that is hosting the protected resources.Authorization Server(Authentik): The trusted system that authenticates users and issues tokensAccess Token: A credential proving authorization to access protected resourcesAuthorization Code: A temporary credential the user receives after successful user authorization, which is then exchanged for an Access Token.Scopes: Permissions defining what access is being requested (e.g.openidfor minimal OIDC, oropenid profile emailfor additional user info)
High-Level Authorization Flow
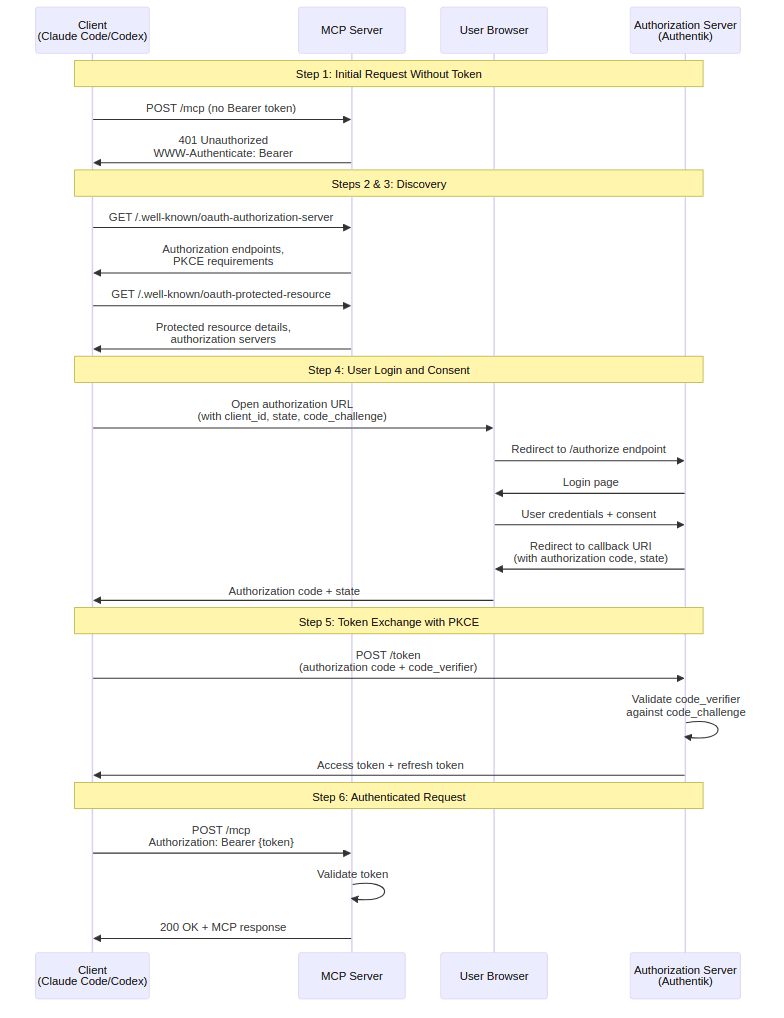
I'll go into detail about each step of this flow as we go through the post, but a quick overview of the flow that we're implementing is:
POST -
/mcp- Client attempts MCP operation without Bearer token
- MCP Server Returns
401 UnauthorizedwithWWW-Authenticate: Bearerheader - Client then knows to begin the OAuth process
GET -
/.well-known/oauth-authorization-server- Client learns about authorization endpoints and PKCE requirements
GET -
/.well-known/oauth-protected-resource- Client learns about the protected resource and authorization servers
Redirect user for login and consent
- Client opens the users browser to the authorization URL
- User signs in (if needed) and gives consent
- Browser redirects to the
redirect_uriwith the authorization code and state
Exchange authorization code for tokens with PKCE
- Client sends a POST request to the
/tokenendpoint, swapping the authorization code for an authorization token
- Client sends a POST request to the
Client retries the MCP operation, using the authorization token in the
Authorizationheader
OAuth Authorization Flows
OAuth 2.0 defines different "flows" (or grant types) for different scenarios. This MCP Server will support the authorization code flow, but we'll also define the device code flow as it's a popular choice and it's helpful to understand the difference.
Code Flow
Often used for web servers, service-side applications, and MCP Servers. The code flow uses a browser for user authorization, requires a redirect URI for callbacks, a Client ID, and optionally a Client Secret (if not using PKCE).
The Authorization Code Flow uses two separate HTTP requests:
Authorization Request: Client redirects user's browser to authorization server
- User authenticates and grants permissions
- Authorization server redirects (
redirect_uri) back with an authorization code - Code is short-lived (60-600 seconds) and single-use
Token Request: Client exchanges authorization code for tokens
- Client makes direct POST request to token endpoint (not through browser)
- Sends authorization code + verification parameters
- Authorization server returns access token (and optionally refresh token, ID token)
It does this in two steps as the process occurs through the browser (potentially insecure), while the token exchange happens server-to-server (secure channel). This prevents token exposure in browser history and referrer headers.
Device Flow
Often used for applications that cannot receive HTTP callbacks, such as CLI tools, smart TVs, IoT devices etc. The user will manually enter a code, often in a browser on the same or different device, and the client polls the token endpoint until the user completes authorization.
CSRF Protection
Within the OAuth authorization flow, a state parameter is used to protect against Cross-Site Request Forgery (CSRF) attacks. For example:
- Attacker starts OAuth flow on their device → Gets redirected to authorization server
- Attacker captures the callback URL (with authorization code) but doesn't complete it
- Attacker tricks YOUR browser into visiting that callback URL (via malicious link, XSS, etc.)
- YOUR browser completes the OAuth flow → Links attacker's account to your session
- Now when you think you're accessing your own data, you're actually accessing attacker's data
The state field prevents this using the following flow:
- Client generates random
statevalue (e.g.,"xqr8TbkZBv7q...") at the start of the authorization flow - Client stores this value (in memory, cookie, or session)
- Client includes
statein authorization request - Authorization server echoes back the same
statein the callback - Client verifies: "Is the state in the callback the same one I generated?"
If the state field matches, the client knows it's legitimate, otherwise it is rejected.
PKCE
PKCE (Proof Key for Code Exchange) is a security extension for OAuth 2.0. It was originally designed for mobile apps but is now recommended for all OAuth clients, including web servers, and is mandatory for OAuth 2.1.
It solves the risk of an attacker intercepting an authorization code. For example:
- User starts OAuth flow in legitimate client
- User authenticates, authorization server generates code
- Code delivered via redirect: http://localhost:3000/callback?code=AUTH_CODE
This could be abused by:
- Attacker intercepts the redirect (malware, proxy, network sniffing)
- Attacker extracts the authorization code
- Attacker races to exchange code for token before legitimate client
- Attacker gains access, user's authorization fails
PKCE works by using the following authorization flow:
- Client generates a cryptographically random string (code verifier)
- Length: 43-128 characters
- Character set:
[A-Z],[a-z],[0-9],-,.,_,~
- Client creates a code challenge, by way of "transforming" (SHA-256 hashing) the code verifier. Note: Later you'll see
code_challenge_methods_supportedwith valuesS256andplain;S256is the SHA-256 hashing, whereasplainis to return the the code verifier without transformation (not recommended). - Client sends authorization request with the code challenge and method. The Authorization Server then:
- Receives and validates the request
- Stores the
code_challengeandcode_challenge_method - Generates an authorization code and binds it to this specific challenge, meaning the authorization code can be exchanged by whoever knows the original verifier only.
- Client exchanges the authorization code for an authorization token, sending the original code verifier without transformation (i.e. no SHA-256 hashing). The Authorization Server then:
- Retrieves the stored challenge and method for the authorization code
- Applies the same transformation (SHA-256 hashing) to the received verifier
- Compares the computed challenge with the stored challenge
- If it matches - an authorization token is issued, otherwise it is rejected.
Without PKCE, the authorization code alone is sufficient to get an access token; anyone who intercepts the code can use it. With PKCE, the code alone is useless; You need both the code AND the original secret (code verifier) that only the legitimate client knows.
Authentik
In order set-up everything needed for this MCP Server, I opted to run authentik to act as a local OAuth Authorization Server.
Initial Set-up
Create the docker-compose.yml file using Appendix A and then run docker compose up (or docker compose up -d if you want to run it in detached mode).
Once everything is running, go to http://${YOUR IP}:9000/if/flow/initial-setup/ in a browser. Note: If you see a Server is starting up. Refreshing in a few seconds message, then Authentik is still bootstrapping so just be patient.
Next, you'll be asked to provide an email/password for the default admin user (akadmin). Set these to whatever you like, as long as you remember what you set them too.
Creating an Application
Once you've set-up the default admin user, you'll be redirected to the My applications page. Click Create a new application and use the following values:
- Application:
- Name -
MCPTest - Leave everything else as default
- Name -
- Choose a Provider:
- Select
OAuth2/OpenID Provider
- Select
- Configure Provider:
- Provider Name -
Provider for MCPTest - Authorization flow -
default-provider-authorization-explicit-consent (Authorize Application) - Protocol settings:
- Client type -
Public - Client ID -
R96uZIUA82grFnOgU2LuiWmGOLrQEq0nWyzlb0bx - Redirect URIs/Origins - add
http://localhost:8080/callback - Logout URI -
http://localhost:8080/logout
- Client type -
- Advanced flow settings:
- Authentication flow:
default-authentication-flow (Welcome to authentik!)
- Authentication flow:
- Leave everything else as default
- Provider Name -
- Configure Bindings:
- Just click
Next(i.e. don't create any bindings)
- Just click
- Review and Submit Application
- Check all the details are correct and then hit
Submit
- Check all the details are correct and then hit
Once submitted, the page will redirect to the Applications page (:9000/if/admin/#/core/applications).
Getting the Provider Details
Now we need to get the details about our new provider. To do this navigate to Applications > Provider in the left navbar, where you should then see the Provider for MCPTest provider.
Click on the provider, and you should see details such as OpenID Configuration URL, Authorize URL etc. Keep this page handy, as we'll need it in a second.
MCP Server
Minimal Server With Logging
First, we're going to create a minimal MCP Server with some logging so we can see what's happening and then start adding authorization step-by-step.
Create the following main.go and middleware.go files:
// main.go

package main

import (
	"fmt"
	"log"
	"net/http"

	"github.com/modelcontextprotocol/go-sdk/mcp"
)

const (
	host = "localhost"
	port = 8080
)

const (
	// From the 'Authentik > Creating an Application' step
	clientID = "R96uZIUA82grFnOgU2LuiWmGOLrQEq0nWyzlb0bx"
	// Taken from the 'OpenID Configuration URL' under Applications > Providers
	issuer                = "http://192.168.1.200:9000/application/o/mcpt/"
	authorizationEndpoint = "http://192.168.1.200:9000/application/o/authorize/"
	tokenEndpoint         = "http://192.168.1.200:9000/application/o/token/"
	revocationEndpoint    = "http://192.168.1.200:9000/application/o/revoke/"
)

var (
	// Taken from the 'OpenID Configuration URL' under Applications > Providers
	scopesSupported              = []string{"openid", "email", "profile"}
	responseTypesSupported       = []string{"code", "id_token", "id_token token", "code token", "code id_token", "code id_token token"}
	grantTypesSupported          = []string{"authorization_code", "refresh_token", "implicit", "client_credentials", "password", "urn:ietf:params:oauth:grant-type:device_code"}
	codeChallengeMethodSupported = []string{"plain", "S256"}
)

func main() {
	server := mcp.NewServer(&mcp.Implementation{
		Name:    "gomcp-auth",
		Version: "0.0.1",
	}, nil)

	server.AddReceivingMiddleware(loggingMiddleware())

	handler := mcp.NewStreamableHTTPHandler(func(req *http.Request) *mcp.Server {
		return server
	}, nil)

	log.Printf("MCP server listening on %s", fmt.Sprintf("%s:%d", host, port))

	// Start the HTTP server
	if err := http.ListenAndServe(fmt.Sprintf("%s:%d", host, port), handler); err != nil {
		log.Fatalf("Server failed: %v", err)
	}

}
// middleware.go

package main

import (
	"context"
	"log"
	"time"

	"github.com/modelcontextprotocol/go-sdk/mcp"
)

func loggingMiddleware() mcp.Middleware {
	return func(next mcp.MethodHandler) mcp.MethodHandler {
		return func(ctx context.Context, method string, req mcp.Request) (mcp.Result, error) {

			log.Printf("[REQUEST] Session: %s | Method: %s", req.GetSession().ID(), method)

			start := time.Now()
			result, err := next(ctx, method, req)
			duration := time.Since(start)

			if err != nil {
				log.Printf("[RESPONSE] Session: %s | Method: %s | Status: ERROR | Duration: %v | Error: %v",
					req.GetSession().ID(),
					method,
					duration,
					err)
			} else {
				log.Printf("[RESPONSE] Session: %s | Method: %s | Status: OK | Duration: %v",
					req.GetSession().ID(),
					method,
					duration)
			}

			return result, err
		}
	}
}
Then, add our MCP Server to ~/.claude.json so Claude Code knows about it:
{
  // rest of config
  "mcpServers": {
    "gomcp-auth": {
      "type": "http",
      "url": "http://localhost:8080/mcp"
    }
  }
}
Now, run the MCP Server (go run .) and run claude mcp list - all being well, you'll see that it's connected successfully and the MCP Server is logging the request/response details:
$ claude mcp list
Checking MCP server health...

gomcp-auth: http://localhost:8080/mcp (HTTP) - ✓ Connected
2025/11/26 14:22:52 MCP server listening on localhost:8080
2025/11/26 14:23:00 [REQUEST] Session: ME2H7LZANS3BIYRQPKIUAELHBZ | Method: initialize
2025/11/26 14:23:00 [RESPONSE] Session: ME2H7LZANS3BIYRQPKIUAELHBZ | Method: initialize | Status: OK | Duration: 6.838µs
2025/11/26 14:23:00 [REQUEST] Session: ME2H7LZANS3BIYRQPKIUAELHBZ | Method: notifications/initialized
2025/11/26 14:23:00 [RESPONSE] Session: ME2H7LZANS3BIYRQPKIUAELHBZ | Method: notifications/initialized | Status: OK | Duration: 4.994µs
Note: At this point our MCP Server doesn't do anything, but we've got a good basis to move on from.
Adding Authorization
Step 1. MCP Server returns 401
The first step in the flow is to check if the client (Claude Code) has a valid Bearer token, allowing them to access the protected routes. If not we'll return a 401 Unauthorized with a WWW-Authenticate: Bearer header, which is used to tell the client what type of authorization the MCP Server expects.
Middleware
Let's add a very basic authorization middleware which checks if a Bearer token has been sent with the request; if it has we'll let the request continue, regardless of validity, otherwise we'll return the 401 response with WWW-Authenticate header mentioned above.
// middleware.go

func authMiddleware(next http.Handler) http.Handler {
	return http.HandlerFunc(func(w http.ResponseWriter, r *http.Request) {
		authHeader := r.Header.Get("Authorization")

		if authHeader == "" || !strings.HasPrefix(authHeader, "Bearer ") {
			w.Header().Set("WWW-Authenticate", "Bearer")
			w.WriteHeader(http.StatusUnauthorized)
			return
		}

		// TODO: Validate the token here
		// For now, we'll accept any Bearer token

		w.WriteHeader(http.StatusOK)
		next.ServeHTTP(w, r)
	})
}
Let's also add another middleware function that logs out the request/response details, similar to loggingMiddleware, but for HTTP requests (more on this in a second).
// middleware.go

// responseWriter wraps http.ResponseWriter to capture status code
type responseWriter struct {
	http.ResponseWriter
	statusCode int
}

// WriteHeader overrides the default to capture status code
func (rw *responseWriter) WriteHeader(code int) {
	rw.statusCode = code
	rw.ResponseWriter.WriteHeader(code)
}

func loggingMiddlewareHTTP(next http.Handler) http.Handler {
	return http.HandlerFunc(func(w http.ResponseWriter, r *http.Request) {
		log.Printf("[HTTP REQUEST] Method: %s | Path: %s | RemoteAddr: %s",
			r.Method,
			r.URL.Path,
			r.RemoteAddr)

		// Wrap the ResponseWriter to capture status code
		rw := &responseWriter{
			ResponseWriter: w,
			statusCode:     200, // Default to 200 if WriteHeader is never called
		}

		start := time.Now()
		next.ServeHTTP(rw, r)
		duration := time.Since(start)

		log.Printf("[HTTP RESPONSE] Method: %s | Path: %s | Status: %d | Duration: %v",
			r.Method,
			r.URL.Path,
			rw.statusCode,
			duration)
	})
}
Using the Middleware
Next we need to change our main func to use this new middleware:
func main() {
	server := mcp.NewServer(&mcp.Implementation{
		Name:    "gomcp-auth",
		Version: "0.0.1",
	}, nil)

	server.AddReceivingMiddleware(loggingMiddleware())

	handler := mcp.NewStreamableHTTPHandler(func(req *http.Request) *mcp.Server {
		return server
	}, nil)

	mux := http.NewServeMux()
	mux.Handle("/", loggingMiddlewareHTTP(handler))
	mux.Handle("/mcp", loggingMiddlewareHTTP(authMiddleware(handler)))

	log.Printf("MCP server listening on %s", fmt.Sprintf("%s:%d", host, port))

	// Start the HTTP server
	if err := http.ListenAndServe(fmt.Sprintf("%s:%d", host, port), mux); err != nil {
		log.Fatalf("Server failed: %v", err)
	}

}
Our MCP Sever has had a new HTTP Serve Mux added, which exposes two new endpoints:
- The root endpoint (
/), which doesn't require authorization - The main MCP endpoint (
/mcp), as we configured it in~/.claude.json, which does require authorization
Now, if you restart the MCP Server and run claude mcp list again - you'll notice that it fails to connect:
$ claude mcp list
Checking MCP server health...

gomcp-auth: http://localhost:8080/mcp (HTTP) - ✗ Failed to connect
Because we added HTTP logging to our middleware, we can see exactly what happened:
- The client first makes a POST request to
/mcp, which results in a 401 because there is no bearer token - It then tries to make a GET request to
/.well-known/oauth-authorization-serverand/.well-known/oauth-protected-resourceto find the details about the OAuth authorization endpoints, PKCE requirements, authorization resources, and authorization servers - It then falls back to making a POST request to
/register, which also doesn't work so the client doesn't know how to continue
2025/11/26 16:29:58 [HTTP REQUEST] Method: POST | Path: /mcp | RemoteAddr: 127.0.0.1:33644
2025/11/26 16:29:58 [HTTP RESPONSE] Method: POST | Path: /mcp | Status: 401 | Duration: 8.601µs

2025/11/26 16:29:58 [HTTP REQUEST] Method: GET | Path: /.well-known/oauth-protected-resource/mcp | RemoteAddr: 127.0.0.1:33652
2025/11/26 16:29:58 [HTTP RESPONSE] Method: GET | Path: /.well-known/oauth-protected-resource/mcp | Status: 405 | Duration: 16.149µs
2025/11/26 16:29:58 [HTTP REQUEST] Method: GET | Path: /.well-known/oauth-protected-resource | RemoteAddr: 127.0.0.1:33644
2025/11/26 16:29:58 [HTTP RESPONSE] Method: GET | Path: /.well-known/oauth-protected-resource | Status: 405 | Duration: 17.147µs
2025/11/26 16:29:58 [HTTP REQUEST] Method: GET | Path: /.well-known/oauth-authorization-server/mcp | RemoteAddr: 127.0.0.1:33652
2025/11/26 16:29:58 [HTTP RESPONSE] Method: GET | Path: /.well-known/oauth-authorization-server/mcp | Status: 405 | Duration: 19.594µs
2025/11/26 16:29:58 [HTTP REQUEST] Method: GET | Path: /.well-known/oauth-authorization-server | RemoteAddr: 127.0.0.1:33644
2025/11/26 16:29:58 [HTTP RESPONSE] Method: GET | Path: /.well-known/oauth-authorization-server | Status: 405 | Duration: 7.066µs
2025/11/26 16:29:58 [HTTP REQUEST] Method: GET | Path: /.well-known/openid-configuration/mcp | RemoteAddr: 127.0.0.1:33652
2025/11/26 16:29:58 [HTTP RESPONSE] Method: GET | Path: /.well-known/openid-configuration/mcp | Status: 405 | Duration: 7.41µs
2025/11/26 16:29:58 [HTTP REQUEST] Method: GET | Path: /mcp/.well-known/openid-configuration | RemoteAddr: 127.0.0.1:33644
2025/11/26 16:29:58 [HTTP RESPONSE] Method: GET | Path: /mcp/.well-known/openid-configuration | Status: 405 | Duration: 19.044µs

2025/11/26 16:29:58 [HTTP REQUEST] Method: POST | Path: /register | RemoteAddr: 127.0.0.1:33652
2025/11/26 16:29:58 [HTTP RESPONSE] Method: POST | Path: /register | Status: 400 | Duration: 343.596µs
If this sounds familiar, it's because we're starting to build out the flow detailed in OAuth Terminology and Authorization Flow > Flow.
Steps 2 & 3. Exposing Authorization Details
The next step is to expose two new endpoints in our HTTP handler for GET /.well-known/oauth-protected-resource and GET /.well-known/oauth-protected-resource.
First, we're going to amend our authorization middleware to include the resource_metadata and realm details in our 401 response as recommended in the MCP Authorization tutorial:
// middleware.go

func authMiddleware(next http.Handler) http.Handler {
	return http.HandlerFunc(func(w http.ResponseWriter, r *http.Request) {
		authHeader := r.Header.Get("Authorization")

		if authHeader == "" || !strings.HasPrefix(authHeader, "Bearer ") {
			resourceMetadataURL := "http://localhost:8080/.well-known/oauth-protected-resource"
			w.Header().Set("WWW-Authenticate", `Bearer realm="mcp", resource_metadata="`+resourceMetadataURL+`"`)
			w.WriteHeader(http.StatusUnauthorized)
			return
		}

		// TODO: Validate the token here
		// For now, we'll accept any Bearer token

		next.ServeHTTP(w, r)
	})
}
Then we'll create two new handlers, for our new endpoints:
// main.go

// handleOauthAuthorizationServer handles /.well-known/oauth-authorization-server
func handleOauthAuthorizationServer() http.HandlerFunc {
	return func(w http.ResponseWriter, r *http.Request) {
		metadata := map[string]any{
			"issuer":                                issuer,
			"authorization_endpoint":                authorizationEndpoint,
			"token_endpoint":                        tokenEndpoint,
			"revocation_endpoint":                   revocationEndpoint,
			"scopes_supported":                      scopesSupported,
			"response_types_supported":              responseTypesSupported,
			"grant_types_supported":                 grantTypesSupported,
			"code_challenge_methods_supported":      codeChallengeMethodSupported,
			"token_endpoint_auth_methods_supported": []string{"none"}, // Public client, no client secret
		}

		w.Header().Set("Content-Type", "application/json")
		w.WriteHeader(http.StatusOK)
		json.NewEncoder(w).Encode(metadata)

	}
}

// handleOauthProtectedResource handles /.well-known/oauth-protected-resource
func handleOauthProtectedResource() http.HandlerFunc {
	return func(w http.ResponseWriter, r *http.Request) {
		metadata := map[string]any{
			"resource":                fmt.Sprintf("http://%s:%d/mcp", host, port),
			"authorization_servers":   []string{issuer},
			"scopes_supported":        scopesSupported,
			"bearer_methods_supported": []string{"header"},
		}

		w.Header().Set("Content-Type", "application/json")
		w.WriteHeader(http.StatusOK)
		json.NewEncoder(w).Encode(metadata)
	}
}
Finally, we'll use these new handlers and refactor the mux logic slightly to make our lives easier:
// main.go

func main() {
	server := mcp.NewServer(&mcp.Implementation{
		Name:    "gomcp-auth",
		Version: "0.0.1",
	}, nil)

	server.AddReceivingMiddleware(loggingMiddleware())

	handler := mcp.NewStreamableHTTPHandler(func(req *http.Request) *mcp.Server {
		return server
	}, nil)

	rootRouter := http.NewServeMux() // => /
	rootRouter.HandleFunc("GET /.well-known/oauth-authorization-server", handleOauthAuthorizationServer())
	rootRouter.HandleFunc("GET /.well-known/oauth-protected-resource", handleOauthProtectedResource())

	mux := http.NewServeMux()
	mux.Handle(
		"/",
		loggingMiddlewareHTTP(rootRouter),
	)
	mux.Handle(
		"/mcp",
		loggingMiddlewareHTTP(authMiddleware(handler)),
	)

	log.Printf("MCP server listening on %s", fmt.Sprintf("%s:%d", host, port))

	// Start the HTTP server
	if err := http.ListenAndServe(fmt.Sprintf("%s:%d", host, port), mux); err != nil {
		log.Fatalf("Server failed: %v", err)
	}

}
Now re-running the server and claude mcp list, we can see the requests are working from our server logs:
$ go run .
2025/11/26 17:39:56 MCP server listening on localhost:8080
2025/11/26 17:40:16 [HTTP REQUEST] Method: POST | Path: /mcp | RemoteAddr: 127.0.0.1:42086
2025/11/26 17:40:16 [HTTP RESPONSE] Method: POST | Path: /mcp | Status: 401 | Duration: 13.98µs
2025/11/26 17:40:16 [HTTP REQUEST] Method: GET | Path: /.well-known/oauth-protected-resource | RemoteAddr: 127.0.0.1:42088
2025/11/26 17:40:16 [HTTP RESPONSE] Method: GET | Path: /.well-known/oauth-protected-resource | Status: 200 | Duration: 161.511µs
Claude Code and DCR
For reasons I don't fully understand, Claude Code seems to have a strict requirement that MCP Servers supports Dynamic Client Registration (DCR) even though it is specifically marked as a MAY/SHOULD in the MCP specification (ref).
Authorization servers and MCP clients MAY support the OAuth 2.0 Dynamic Client Registration Protocol (RFC7591).
$ claude mcp list
Checking MCP server health...

gomcp-auth: http://localhost:8080/mcp (HTTP) - ✗ Failed to connect
> /mcp
╭───────────────────────────────────────────────────────────────────────────────────────────────────────────────────────────────────────────────────────╮
│ Gomcp-auth MCP Server                                                                                                                                 │
│                                                                                                                                                       │
│ Status: ✘ failed                                                                                                                                      │
│ URL: http://localhost:8080/mcp                                                                                                                        │
│                                                                                                                                                       │
│ Error: Incompatible auth server: does not support dynamic client registration                                                                         │
│                                                                                                                                                       │
│ ❯ 1. Authenticate                                                                                                                                     │
│   2. Reconnect                                                                                                                                        │
│   3. Disable                                                                                                                                          │
╰───────────────────────────────────────────────────────────────────────────────────────────────────────────────────────────────────────────────────────╯
As far as I can tell, this error is occuring because Authentik doesn't support DCR via a /register endpoint. To fix it, I had to change the issuer from http://192.168.1.200:9000/application/o/mcpt/ to the MCP Server (http://localhost:8080) and implement a /register endpoint, which is covered in the next section.
Step 4. Redirecting the User for Login and Consent
Attempting to add the MCP Server to Codex, as Claude Code is blocked on the DCR issue from above, we can see that the client is trying to automatically redirect to Authentik to handle the authorization and consent:
$ codex mcp add --url "http://localhost:8080/mcp" gomcp-auth
Added global MCP server 'gomcp-auth'.
Detected OAuth support. Starting OAuth flow…
Authorize `gomcp-auth` by opening this URL in your browser:
http://192.168.1.200:9000/application/o/authorize/?response_type=code&client_id=mcp-client&state=n9uwVx4gpBSoUtHxYZexpA&code_challenge=cbsq3AWtw0wdpArtJMNuMGtVrarekhXNO8oLeqgZscg&code_challenge_method=S256&redirect_uri=http%3A%2F%2F127.0.0.1%3A46075%2Fcallback
Unfortunately, when it opens the browser, it results in a The client identifier (client_id) is missing or invalid error because it's trying to use a Client ID of mcp-client and not R96uZIUA82grFnOgU2LuiWmGOLrQEq0nWyzlb0bx
For this we need to add in another new endpoint (/register), which is usually used for DCR but seems to be the only way of setting the Client ID.
First create the handler:
// main.go

// handleRegister handles the /register endpoint
func handleRegister() http.HandlerFunc {
	return func(w http.ResponseWriter, r *http.Request) {
		// Stub implementation: always return the pre-configured client
		// This satisfies DCR expectations without actually doing dynamic registration
		response := map[string]any{
			"client_id":                  clientID,
			"token_endpoint_auth_method": "none",
			"grant_types":                []string{"authorization_code", "refresh_token"},
			"response_types":             []string{"code"},
			"redirect_uris":              []string{fmt.Sprintf("http://%s:%d/callback", host, port)},
		}

		w.Header().Set("Content-Type", "application/json")
		w.WriteHeader(http.StatusCreated) // 201 Created per OAuth 2.0 DCR spec
		json.NewEncoder(w).Encode(response)
	}
}
Then use it for the /register endpoint:
// main.go

	rootRouter := http.NewServeMux() // => /
	rootRouter.HandleFunc("GET /.well-known/oauth-authorization-server", handleOauthAuthorizationServer())
	rootRouter.HandleFunc("GET /.well-known/oauth-protected-resource", handleOauthProtectedResource())
	rootRouter.HandleFunc("POST /register", handleRegister())
If we then retry the /mcp command, we can see that Claude Code automatically recognises that it needs authentication:
> /mcp

MCP Config Diagnostics

For help configuring MCP servers, see: https://docs.claude.com/en/docs/claude-code/mcp

╭───────────────────────────────────────────────────────────────────────────────────────────────────────────────────────────────────────────────────────╮
│ Manage MCP servers                                                                                                                                    │
│                                                                                                                                                       │
│ ❯ 1. gomcp-auth            △ needs authentication · Enter to login                                                                                    │
│                                                                                                                                                       │
╰───────────────────────────────────────────────────────────────────────────────────────────────────────────────────────────────────────────────────────╯
If we follow the authentication process the Client ID is now correct (client_id=R96uZIUA82grFnOgU2LuiWmGOLrQEq0nWyzlb0bx), but we've got a new error - The request fails due to a missing, invalid, or mismatching redirection URI (redirect_uri).
Authenticating with gomcp-auth…

*  A browser window will open for authentication

If your browser doesn't open automatically, copy this URL manually:
http://192.168.1.200:9000/application/o/authorize/?response_type=code&client_id=R96uZIUA82grFnOgU2LuiWmGOLrQEq0nWyzlb0bx&code_challenge=_zzNZZB4uu6eBc0gA
GPpBON9R9ks85twBMS2MY95y_M&code_challenge_method=S256&redirect_uri=http%3A%2F%2Flocalhost%3A64078%2Fcallback&state=NRTXUVr0yQiDnvpKfk08hdZ_auznAn-xhWxCjO
NZ-d4&scope=openid+email+profile&resource=http%3A%2F%2Flocalhost%3A8080%2Fmcp
If we decode the URL we can see:
- It's redirecting the user to
http://192.168.1.200:9000/application/o/authorize/, which is what we configured in the MCP Server (authorizationEndpointwhich gets returned in the/.well-known/oauth-authorization-serverendpoint) response_type=code- tells the authorization server that a successful response should include an authorization code, which the client can exchange for an access token.client_id=R96uZIUA82grFnOgU2LuiWmGOLrQEq0nWyzlb0bx- the Client ID we configured via the/registerendpointstate=NRTXUVr0yQiDnvpKfk08hdZ_auznAn-xhWxCjONZ-d4- see CSRF section for more detailscode_challenge=_zzNZZB4uu6eBc0gAGPpBON9R9ks85twBMS2MY95y_M&- see PKCE section for more detailscode_challenge_method=S256- see PKCE section for more detailsredirect_uri=http://localhost:64078/callback- the redirect URI that should be used on successful authorization
The missing, invalid, or mismatching redirection URI error is happening because Authentik is rejecting the OAuth request due to the redirect URI not matching what was configured for the provider; When we added the MCP server with Codex, it uses a dynamically generated callback URI with a random port (e.g. http://127.0.0.1:46157/callback), but we configured http://localhost:8080/callback.
If we look at RFC8252, which outlines the best practices for OAuth 2.0 for Native Apps, section 7.3 specifically states:
Native apps that are able to open a port on the loopback network interface without needing special permissions (typically, those on desktop operating systems) can use the loopback interface to receive the OAuth redirect.
Loopback redirect URIs use the "http" scheme and are constructed with the loopback IP literal and whatever port the client is listening on.
That is, "http://127.0.0.1:\{port\}/\{path\}" for IPv4, and "http://[::1]:{port}/{path}" for IPv6. An example redirect using the IPv4 loopback interface with a randomly assigned port:
http://127.0.0.1:51004/oauth2redirect/example-provider
An example redirect using the IPv6 loopback interface with a randomly assigned port:
http://[::1]:61023/oauth2redirect/example-provider
The authorization server MUST allow any port to be specified at the time of the request for loopback IP redirect URIs, to accommodate clients that obtain an available ephemeral port from the operating system at the time of the request.
Clients SHOULD NOT assume that the device supports a particular version of the Internet Protocol. It is RECOMMENDED that clients attempt to bind to the loopback interface using both IPv4 and IPv6 and use whichever is available.
The important part being the second to last paragraph, which states that the authorization server must allow any port to be specified, to accommodate clients that obtain an available ephemeral port.
To fix this, we'll change the Redirect URI from http://localhost:8080/callback to http://localhost:.*/callback; making sure to change the type from Strict to Regex. The Redirect URIs section of the provider should now show one entry - regex: http://localhost:.*/callback.
Run the authentication process again, and it should automatically redirect the browser to Authentik where it will ask you to approve the sign-in request.
Assuming you approve the request, the browser should show Authentication complete. You may close this window., and the Claude Code command should have completed successfully:
> /mcp
  ⎿  Authentication successful. Connected to gomcp-auth.
Step 5. Exchange Authorization Code for Authorization Token
Behind the scenes Claude Code will have exchanged the authorization code for an authorization token, via the token endpoint (http://192.168.1.200:9000/application/o/token/) that we configured in the MCP Server and exposed via the /.well-known/oauth-authorization-server endpoint.
At this point, Claude Code now has a valid authorization token.
Step 6. Retry MCP Operation with Authorization Token
Running claude mcp list, we'll see that our MCP Server is connected:
$ claude mcp list
Checking MCP server health...

gomcp-auth: http://localhost:8080/mcp (HTTP) - ✓ Connected
If we open Claude Code, we should see the MCP logs show that we have a valid Bearer Token by returning a non-401 response on the /mcp endpoint, proving that we have successfully authenticated and exchanged the authorization code for an authorization token:
2025/11/27 09:33:59 [HTTP REQUEST] Method: GET | Path: /.well-known/oauth-authorization-server/mcp | RemoteAddr: 127.0.0.1:46160
2025/11/27 09:33:59 [HTTP RESPONSE] Method: GET | Path: /.well-known/oauth-authorization-server/mcp | Status: 404 | Duration: 22.442µs
2025/11/27 09:33:59 [HTTP REQUEST] Method: GET | Path: /mcp/.well-known/oauth-authorization-server | RemoteAddr: 127.0.0.1:46160
2025/11/27 09:33:59 [HTTP RESPONSE] Method: GET | Path: /mcp/.well-known/oauth-authorization-server | Status: 404 | Duration: 24.044µs
2025/11/27 09:33:59 [HTTP REQUEST] Method: GET | Path: /.well-known/oauth-authorization-server | RemoteAddr: 127.0.0.1:46160
2025/11/27 09:33:59 [HTTP RESPONSE] Method: GET | Path: /.well-known/oauth-authorization-server | Status: 200 | Duration: 21.258µs
2025/11/27 09:33:59 [HTTP REQUEST] Method: POST | Path: /mcp | RemoteAddr: 127.0.0.1:46160
2025/11/27 09:33:59 [REQUEST] Session: UTO6SH2HMMHWU4NZT74YDILSL4 | Method: initialize
2025/11/27 09:33:59 [RESPONSE] Session: UTO6SH2HMMHWU4NZT74YDILSL4 | Method: initialize | Status: OK | Duration: 3.68µs
2025/11/27 09:33:59 [HTTP RESPONSE] Method: POST | Path: /mcp | Status: 200 | Duration: 458.581µs
2025/11/27 09:33:59 [HTTP REQUEST] Method: POST | Path: /mcp | RemoteAddr: 127.0.0.1:46160
2025/11/27 09:33:59 [HTTP RESPONSE] Method: POST | Path: /mcp | Status: 202 | Duration: 14.449µs
2025/11/27 09:33:59 [REQUEST] Session: UTO6SH2HMMHWU4NZT74YDILSL4 | Method: notifications/initialized
2025/11/27 09:33:59 [RESPONSE] Session: UTO6SH2HMMHWU4NZT74YDILSL4 | Method: notifications/initialized | Status: OK | Duration: 1.503µs
2025/11/27 09:33:59 [HTTP REQUEST] Method: GET | Path: /mcp | RemoteAddr: 127.0.0.1:46160
Troubleshooting
Codex
If you're following along with codex, running the /mcp slash command may not recognise our MCP Server:
/mcp

🔌  MCP Tools

  • No MCP tools available.
I'm not 100% sure why at this stage, but the responseWriter wrapper seems to be the culprit and seems to stop the MCP client from making requests to the MCP specific endpoints (e.g. tools/list).
Not wanting to spend too much time trying to figure out why, at this stage, I managed to fix it by getting rid of the wrapper:
func loggingMiddlewareHTTP(next http.Handler) http.Handler {
	return http.HandlerFunc(func(w http.ResponseWriter, r *http.Request) {
		log.Printf("[HTTP REQUEST] Method: %s | Path: %s | Query: %s | RemoteAddr: %s",
			r.Method,
			r.URL.Path,
			r.URL.RawQuery,
			r.RemoteAddr)

		start := time.Now()
		next.ServeHTTP(w, r)
		duration := time.Since(start)

		log.Printf("[HTTP RESPONSE] Method: %s | Path: %s | Duration: %v",
			r.Method,
			r.URL.Path,
			duration)
	})
}
And then it worked after restarting the server:
/mcp

🔌  MCP Tools

  • gomcp-auth
    • Status: enabled
    • Auth: OAuth
    • URL: http://localhost:8080/mcp
    • Tools: sayHello
    • Resources: (none)
    • Resource templates: (none)
And the logout/login functionality still works:
$ codex mcp logout gomcp-auth
Removed OAuth credentials for 'gomcp-auth'.

$ codex mcp login gomcp-auth
Authorize `gomcp-auth` by opening this URL in your browser:
http://192.168.1.200:9000/application/o/authorize/?response_type=code&client_id=R96uZIUA82grFnOgU2LuiWmGOLrQEq0nWyzlb0bx&state=n6sf_xLfOgm2Ybg7ZY6-sQ&code_challenge=J5y1eRMFcxodY-mt9zVl01JWoNBo5vARBar0-NjUdzA&code_challenge_method=S256&redirect_uri=http%3A%2F%2F127.0.0.1%3A34511%2Fcallback

Successfully logged in to MCP server 'gomcp-auth'.

/mcp

🔌  MCP Tools

  • gomcp-auth
    • Status: enabled
    • Auth: OAuth
    • URL: http://localhost:8080/mcp
    • Tools: sayHello
    • Resources: (none)
    • Resource templates: (none)
Next Steps
These won't be covered in this post, but things I plan on doing next include:
- Adding proper token validation to
authMiddleware - Create some MCP Server tools
Appendix
Appendix A
services:
  authentik_postgresql:
    environment:
      POSTGRES_DB: authentik
      POSTGRES_PASSWORD: password
      POSTGRES_USER: authentik
    healthcheck:
      interval: 30s
      retries: 5
      start_period: 20s
      test:
        - CMD-SHELL
        - pg_isready -d $${POSTGRES_DB} -U $${POSTGRES_USER}
      timeout: 5s
    image: docker.io/library/postgres:16-alpine
    restart: unless-stopped
    volumes:
      - database:/var/lib/postgresql/data
  authentik_server:
    command: server
    depends_on:
      authentik_postgresql:
        condition: service_healthy
    environment:
      AUTHENTIK_POSTGRESQL__HOST: authentik_postgresql
      AUTHENTIK_POSTGRESQL__NAME: authentik
      AUTHENTIK_POSTGRESQL__PASSWORD: password
      AUTHENTIK_POSTGRESQL__USER: authentik
      AUTHENTIK_SECRET_KEY: sososecret
    image: ${AUTHENTIK_IMAGE:-ghcr.io/goauthentik/server}:${AUTHENTIK_TAG:-2025.10.2}
    ports:
      - ${COMPOSE_PORT_HTTP:-9000}:9000
      - ${COMPOSE_PORT_HTTPS:-9443}:9443
    restart: unless-stopped
    volumes:
      - ./media:/media
      - ./custom-templates:/templates
  authentik_worker:
    command: worker
    depends_on:
      authentik_postgresql:
        condition: service_healthy
    environment:
      AUTHENTIK_POSTGRESQL__HOST: authentik_postgresql
      AUTHENTIK_POSTGRESQL__NAME: authentik
      AUTHENTIK_POSTGRESQL__PASSWORD: password
      AUTHENTIK_POSTGRESQL__USER: authentik
      AUTHENTIK_SECRET_KEY: sososecret
    image: ${AUTHENTIK_IMAGE:-ghcr.io/goauthentik/server}:${AUTHENTIK_TAG:-2025.10.2}
    restart: unless-stopped
    user: root
    volumes:
      - /var/run/docker.sock:/var/run/docker.sock
      - ./media:/media
      - ./certs:/certs
      - ./custom-templates:/templates
volumes:
  database:
    driver: local